Looking for a way to organize files in the WordPress media library? Media is one of the important components of every website. WordPress has its default media features to manage images, audio, videos, and other files you uploaded on your website. You can also edit your uploaded media files too. There are two options in media features from the first option you can view, edit and delete media files. And from the second option, you can upload media files to your website. You can also upload a media file in your post or page edit page too. WordPress also has the drag and drop features to upload files.
WordPress media library has many features but the lacking is that you don’t find any features to organize your uploaded files. The file will be stored in your media library based on the uploaded data. There are a few filter options available. You can see the file based on a specific month or specific files like only images or only videos. You can also search for any specific file by using the search option but there is no option to store the media file in any specific folder.
If you are running a media-based website like a media host, media sales then you may need more control over your website media library. A well-organized media library is very essential for you to make your workflow easier. Here in this article, we will show you how to easily organize files in the WordPress media library.
Organize files in the WordPress media library
to organize your files on your WordPress website you need to install a third-party plugin. There are many plugins available that offer file management on WordPress. Here in this tutorial, we are using the FileBird – WordPress Media Library Folders & File Manager plugin. This plugin will enable you to organize WordPress media library folders using a drag and drop organizer. Install and activate the plugin and go to the Media > Library page to see the plugin option.
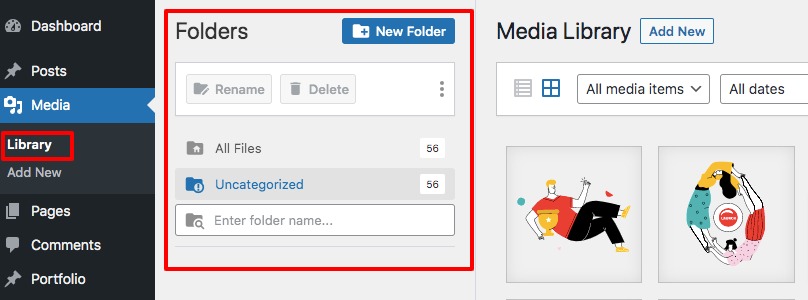
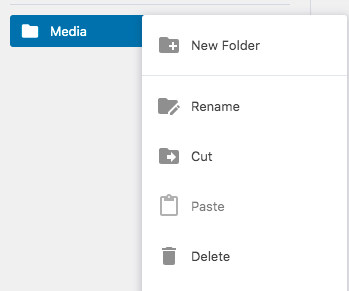
You can create a folder by clicking on the New Folder button. The folder will not be created on your website root directory instead it will create a virtual folder. Right-click on your created folder to see the folder option.
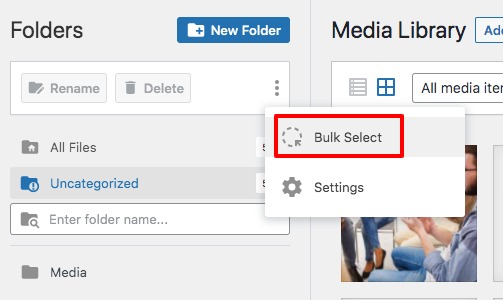
You can also upload a folder from your computer using the drag and drop features. By default, there will be two folders that can not be edited or deleted. You can also use the bulk feature option to bulk select and edit the folder you created.
Another awesome feature of this plugin is that you can create an image gallery using a folder in Gutenberg block. Open up a page or post where you want to use the image gallery. Click on the “+” icon to add a block and then search for FileBird, click on the block to add it on your pages. Now you can select a specific folder to create an image gallery.
Wrapping up
Following the process, you will be able to organize files in the WordPress media library. You can see our other articles to learn How to update the WordPress theme without losing customization
How to merge and bulk edit WordPress categories and tag
How to remove additional information tab in WooCommerce
We hope this article will help you. If you like this article please like our Facebook Page to stay connected.