
Do you want to set up shipping classes in WooCommerce? In our previous article, we show you the way to add shipping zones and shipping methods in WooCommerce. If you missed that you can check that out.
How To Setup Shipping Zones In WooCommerce.
Shipping classes are also very important features to categorized similar types of products for shipping. If your store has many products of the same types then you can add a shipping class for all of those products. For example, you are selling a bulk amount of similar mask items. Then you can set shipping classes for those items with their own shipping method and cost.
If you are confusing about the term shipping classes, don’t worry here in this article we will guide you to set up shipping classes in WooCommerce.
What are Shipping Classes?
In one word, Shipping Classes are the way to categorize the same types of products where you can apply different rules and different pricing for shipping those products. In different shipping classes, you can add different shipping rules. These rules will only affect shipping classes products. Others products will not have any effect on that rules.
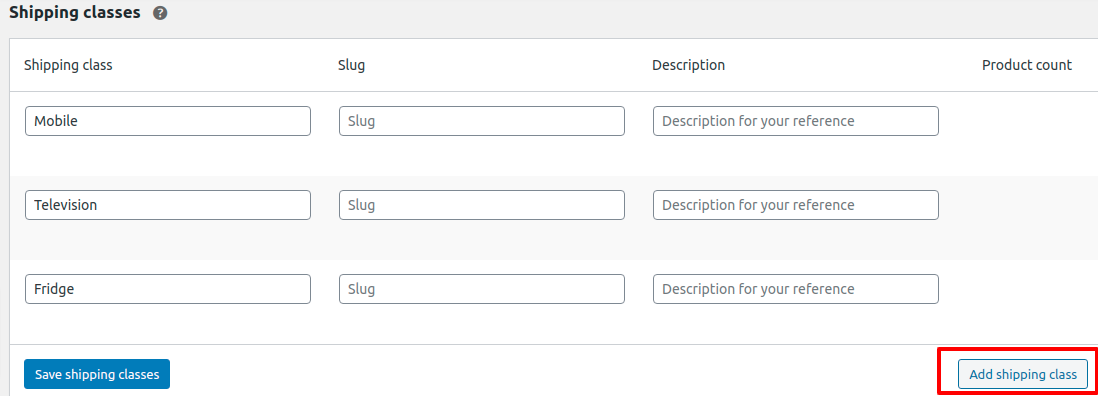
For example. you run an online store selling electronic products like mobile devices, mobile accessories, television, fridges, and others. In your shop, mobile devices and accessories are more lite weight than television. On the other hand, television is more lite light than the fridge. So the shipping cost will not be the same for these three types of products. So the solution is to use shipping classes here. You can set three different shipping classes for mobile devices and accessories, television, fridges. Three shipping classes have three different types of products. Now you can add different shipping coast for your products. As mobile devices are more lite-weight so it requires less cost to ship. On the other hand, the television and fridge need a bit more extra cost to ship.
This is how the shipping classes concept work. Now we are going to set up our shipping classes.
Setup Shipping Classes in WooCommerce
Adding shipping classes is very easy but before adding it you need to know how it works. If you know the concept and have an idea about which products to group up then you can easily set up your shipping classes.
Creating Shipping Classes
Log in to your WordPress website and from the dashboard go to WooCommerce > Settings. Your WooCommerce shipping page will show up and then click on the Shipping tab.
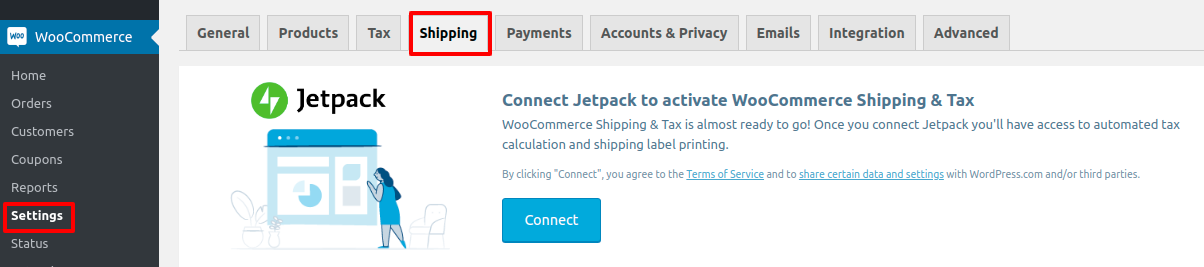
Now you can see the Shipping Classes option under Shipping Zones. Click on the Shipping Classes tab.

It will open up your Shipping Classes configuration page and you can see three different fields to fill up.
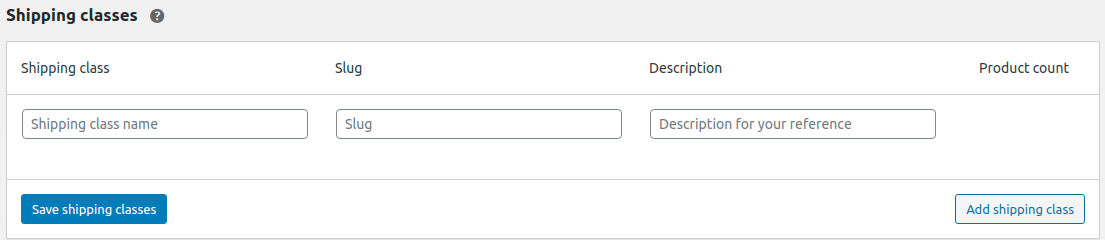
Shipping Class
In this field, you need to add your shipping class name. You can add anything you desire here. But you need to add a related name with your products or related to your shipping rules so that you can identify it easily. For example, you can add the products category name here like Mobile devices, or can add the weight limit here like 500 gram to 1000 grams.
Slug
Slug is the identifier of your class. You need to add a unique slug name for your classes. No duplicate slug will be applicable. You can leave as blank the slug will be automatically generated for the shipping classes.
Description
In the description, the field adds some descriptions about your products like the products types, dimensions, weight, or anything related or important for your shipping classes. You can all of that info in the description file.
Add multiple shipping class
You can add multiple shipping classes by clicking on the add shipping class option on the right bottom.
When you have covered up all the shipping classes you need the click on the Save Shipping Class button on the left bottom to save your created shipping classes. After successfully created the classes you can view all the classes in one place. If you want you can edit the shipping classes. Hover on the shipping class name and you can find two options Edit and Remove. You can edit or remove your classes easily.
Add products in Shipping Classes
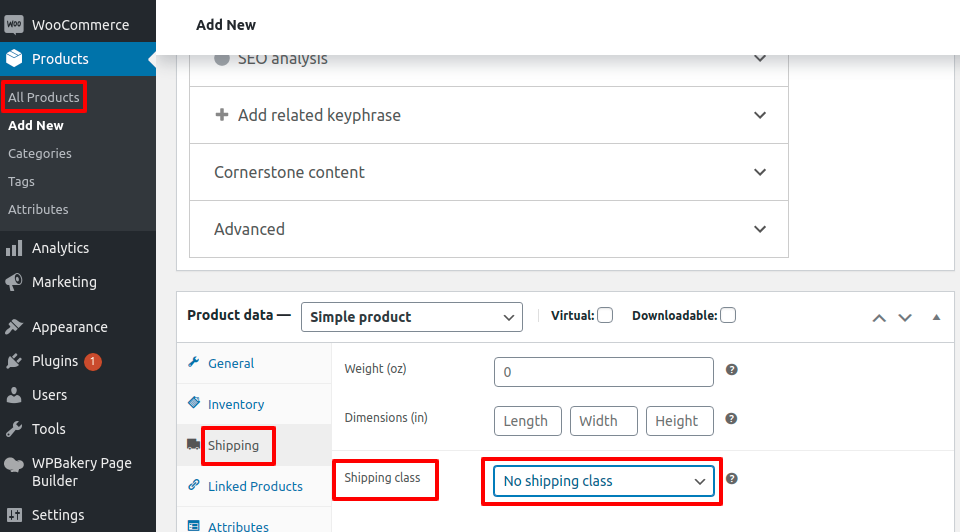
To add shipping classes to your products go to your products list from the dashboard. Then open up the products where you want to add shipping classes. Then scroll down until you find the Product Data option. Then in the shipping tab, you can find the shipping classes option. From the drop-down menu of the shipping classes, you will be able to see all the classes you created. Choose the perfect classes for the products and update it. Your products will be added to these shipping classes.
If you want to add multiple products in the same shipping classes then you can use the bulk action option. Go back to your products list and select all the products you want to add to the shipping class. Then from the bulk action drop-down menu select edit and then choose the shipping classes. This process will add the shipping classes for all the products you selected.
Wrapping up
Shipping classes are very helpful if you added them perfectly. It will flexible your work by reducing time for calculating shipping costs for each product.
By following this tutorial you can easily add shipping classes that will help your selling. If you have any problem you can check our Website Maintenance services. We will manage and customize your website professionally.