Looking for a way to add a button to the header in WordPress? Here in this article, we will guide you to the easiest way to add a button to the header in WordPress.
Call to action is a great way to attract your users for any specific promotion or task. It is easily noticeable and easy to locate for the users. Adding a button in your WordPress website header is a great call to action example. A button in your header is easily noticeable for the users so it can get more clicks.
Importance of adding a button to the header in WordPress
For most websites, the WordPress header menu has plain text with some important links to your website pages. All these links are the most important pages or sections of your website. When a user landed on your website at first they looked for the header menu to navigate your website. If they want any specific information at first they look for the header many to find it.
If you create a new campaign or add your sign-up for or product link, the header menu is the perfect choice to place the link to easily noticeable. The button in the header menu get those links easily visible to the users and provides them a better user experience. You can also get more clicks and engagement in this process.
In your WordPress website, you can easily add buttons to your posts or pages using the default button block. But WordPress doesn’t provide you with any features to add a button in the WordPress header menu. So let’s see how you can add a button in your website header.
Add a button to the header in WordPress
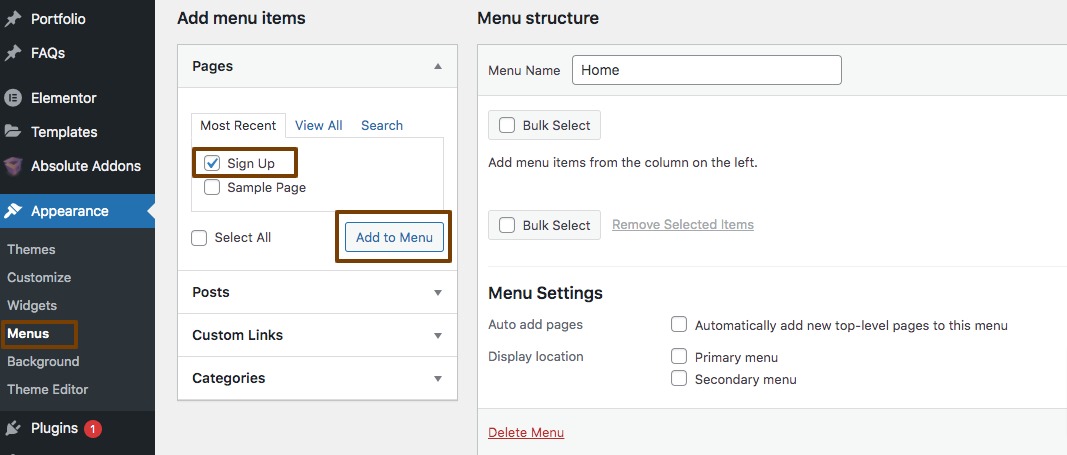
To add a button in your website header first you need to add the link you want to add to your WordPress navigation menu. For this go to the Appearance > Menus page and add the link to your website menu.

After adding your menu click on the Screen Option at the top right of your screen and expand some options. From there you need to check the CSS Classes box.

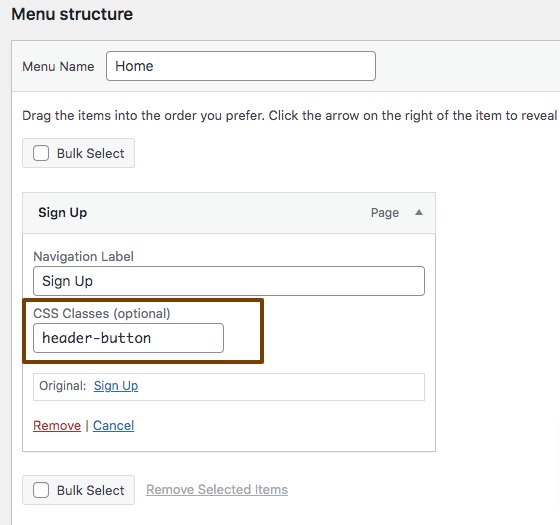
Now go back to the menu section and expand the menu you just added. You will notice a new CSS Classes option there. In the CSS Classes field, you need to add a class name for this menu. You can add any class name but the class name should be unique. Here we are adding the class name as header-button.

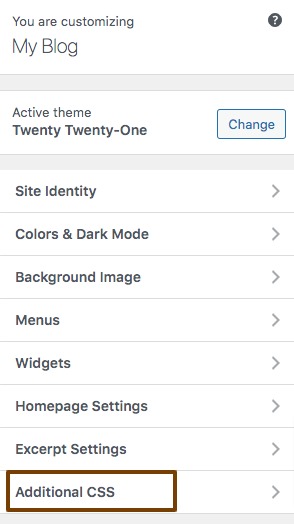
After adding the CSS classes click on the Save Menu button. Now you need to add the CSS class to your menu by custom CSS. To add custom CSS go to Appearance > Customize > Additional CSS option.

Now you need to add the following code in the additional CSS field.
.header-button {

background-color:#ffff;

border:2px;

border-radius:3px;

}
After adding the code you will see a visual of your action. Using CSS you can create your own style for the button. You can change the text color, border color, background color. You can also add a hover effect for the button too. But don’t worry your customization won’t be published until you click on the publish button.

When you are satisfied with your design click on the publish button to live your action.
Wrapping up
Following the process, you will be able to create a button to the header in your WordPress website. You can see our other articles to learn How to remove or add capabilities to user roles in WordPress
How to add custom fonts in WordPress
How to create a sticky floating navigation menu in a WordPress website
We hope this article will help you. If you like this article, please like our Facebook Page to stay connected.


